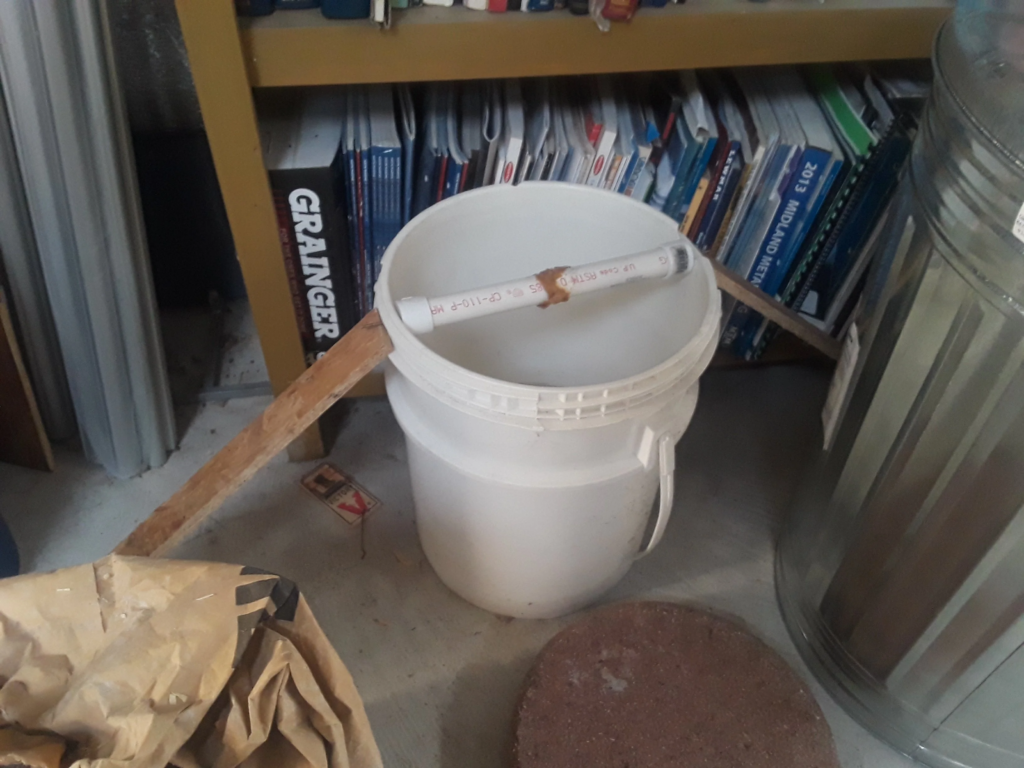
Home Made Mouse Trap With Bucket| Bucket Mice Trap DIY

DIY Homemade Mouse Traps: Cost-Effective Solutions
Mouse Trap: While there are various commercial mouse traps available in the market, they can be expensive and may contain harmful chemicals. Homemade mouse traps, on the other hand, offer a cost-effective and environmentally friendly solution to your mouse problems. By using materials you already have at home, you can create a simple yet effective trap that will help you eliminate these unwanted guests.

Homemade mouse traps are not only budget-friendly but also provide a humane way to catch and release mice. Unlike traditional traps that can harm or kill the mice, homemade traps allow you to capture the rodents without causing them unnecessary suffering. This makes them a more ethical choice for those who prefer a non-lethal approach.
Materials needed for a homemade mouse trap with a bucket

To create a homemade mouse trap with a bucket, you’ll need the following materials:
Bucket: Choose a sturdy bucket with a capacity of at least 5 gallons. Make sure it has a smooth interior to prevent mice from climbing out.
String or wire: Use a strong string or wire to create a mechanism that will enable the trap to be triggered.
Wooden plank or dowel: This will act as a ramp for the mice to climb into the bucket.
Empty soda can: You’ll use this as a balancing point for the trap.
These materials are readily available in most households, making this homemade mouse trap an accessible option for anyone dealing with a mouse infestation.
Step-by-step instructions for building a homemade mouse trap with a bucket

Follow these step-by-step instructions to build your own homemade mouse trap with a bucket:
Find a suitable location: Identify an area where you’ve noticed mouse activity, such as near baseboards or in corners. This will be the ideal spot to set up your trap.
Place the bucket: Position the bucket against a wall or a sturdy surface. Ensure that the opening of the bucket is parallel to the wall, creating a straight path for the mice.
Create the ramp: Take the wooden plank or dowel and place one end on the ground, while the other end rests on the edge of the bucket. This will allow the mice to climb up and enter the bucket.
Attach the balancing point: Take the empty soda can and place it on the edge of the bucket. Position it in a way that it’s balanced, with one end of the plank touching the can. This will create a mechanism that will trigger the trap when the mice step on it.
Bait the trap: Place a small amount of bait, such as peanut butter or cheese, on the end of the plank that is inside the bucket. This will entice the mice to climb onto the ramp and trigger the trap.
How does the homemade mouse trap with a bucket work?

The homemade mouse trap with a bucket works on the principle of using the weight of the mice to trigger the trap. When the mice climb up the ramp to reach the bait, they will eventually step onto the balancing point, causing the plank to tilt. As a result, the mice will lose their balance and fall into the bucket.
The smooth interior of the bucket prevents the mice from climbing out, effectively trapping them inside. The height of the bucket also makes it difficult for the mice to jump out once they are inside. This ensures that the trap is highly effective in catching the mice and preventing their escape.
Tips for setting up and baiting the homemade mouse trap

To increase the success rate of your homemade mouse trap, consider the following tips:
Position the trap strategically: Place the trap in areas where you’ve noticed mouse activity, such as along walls or near food sources.
Use fresh bait: Mice are attracted to strong odors, so using fresh bait like peanut butter or cheese will increase the chances of them being lured into the trap.
Check the trap regularly: It’s important to check the trap frequently to ensure that any caught mice are promptly released or disposed of.
Experiment with different baits: If one type of bait doesn’t seem to be effective, try using a different bait to see what attracts the mice the most.
By following these tips, you’ll maximize the effectiveness of your homemade mouse trap and increase your chances of successfully catching the mice.
Benefits of using a homemade mouse trap with a bucket

Using a homemade mouse trap with a bucket offers several benefits:
Cost-effective: Homemade mouse traps are a budget-friendly alternative to commercial traps, which can be expensive.
Environmentally friendly: Homemade traps are free from harmful chemicals, making them a safer option for both humans and the environment.
Humane approach: Unlike traditional traps that may harm or kill the mice, homemade traps provide a non-lethal method of catching and releasing the rodents.
Reusable: Homemade traps can be used multiple times, allowing you to catch multiple mice without needing to purchase additional traps.
By opting for a homemade mouse trap with a bucket, you’ll not only save money but also contribute to a more eco-friendly and ethical solution for your mouse problems.
Potential drawbacks of using a homemade mouse trap with a bucket

While homemade mouse traps can be effective, there are a few potential drawbacks to consider:
Time and effort: Building and setting up a homemade mouse trap requires time and effort compared to simply purchasing a ready-made trap.
Limited capacity: The size of the bucket determines the number of mice that can be caught at once. If you have a large infestation, you may need to empty the trap frequently.
Inconsistent results: Homemade traps may not always yield consistent results, as mice can be cautious and may avoid the trap altogether.
Despite these potential drawbacks, many people have found homemade mouse traps to be highly effective in controlling mouse populations in their homes.
Alternative homemade mouse trap ideas

If the homemade mouse trap with a bucket doesn’t suit your needs or preferences, consider these alternative ideas:
Tin can trap: Place an empty tin can on its side with a small amount of bait inside. As the mice enter, they will knock over the can, trapping themselves inside.
Cardboard tube trap: Roll up a piece of cardboard into a tube and secure it with tape. Place bait at one end, and the mice will enter but won’t be able to exit.
These alternative homemade mouse traps offer different approaches to catching mice, so you can choose the one that suits your preferences and materials available.
Safety precautions when using homemade mouse traps

While homemade mouse traps are generally safe to use, it’s important to take some safety precautions:
Keep traps out of reach of children and pets: Ensure that the traps are placed in areas inaccessible to children and pets to prevent any accidents.
Use gloves when handling traps: Wear gloves when setting up or emptying the traps to avoid direct contact with rodents or their waste, which may carry diseases.
Disinfect the trap and surrounding area: After emptying the trap, clean it thoroughly with a disinfectant to prevent the spread of bacteria or other pathogens.
By following these safety precautions, you can ensure a safe and effective use of homemade mouse traps in your home.
Conclusion
With the homemade mouse trap with a bucket, you now have a cost-effective and humane solution to your mouse problems. By using materials readily available in your home, you can construct a trap that effectively catches and contains mice without causing them harm. Whether you choose to build the trap described in this article or experiment with alternative ideas, remember to prioritize safety and regularly check and empty the traps.
Don’t let mice continue to invade your space. Take control of your home by trying out this homemade mouse trap with a bucket.
Read more: Home Depot Live Mouse Trap


